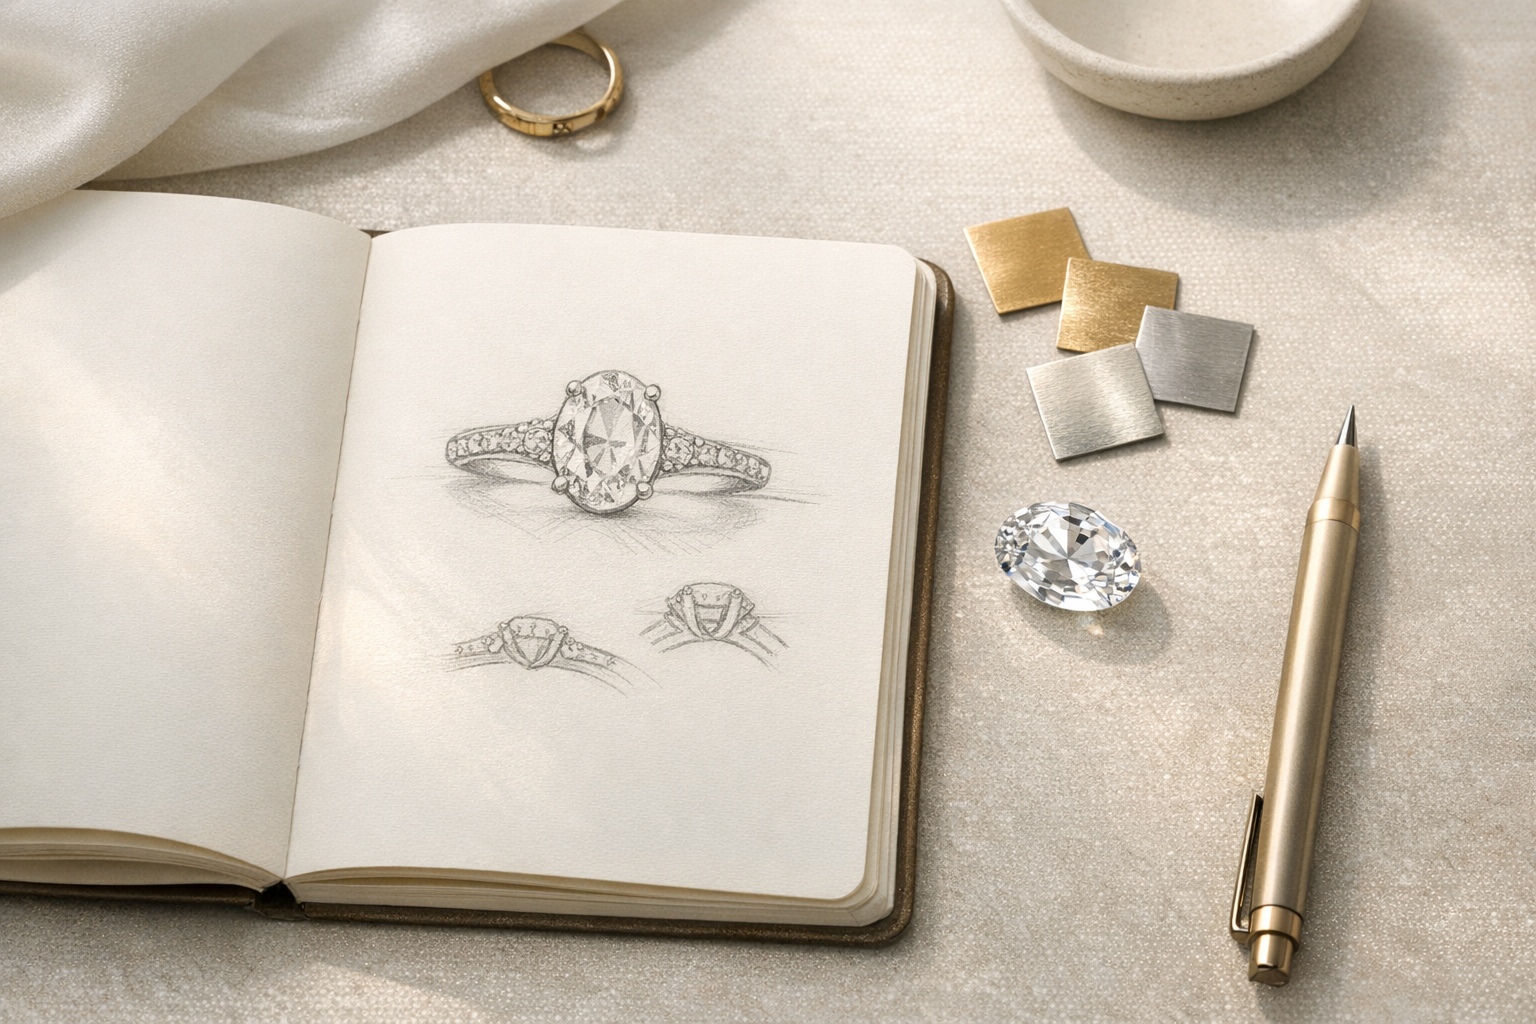
How to Design Your Dream Engagement Ring (Without the Stress)
If you have ever opened a ring gallery and felt your brain short-circuit - oval, emerald, cathedral, hidden halo - you are not alone. Designing a ring is emotional, visual, and practical. The good news is that learning how to design an engagement ring is not about memorizing jewelry jargon. It is about making a few smart decisions in the right order so everything else becomes easier.
In this guide, you will build a clear ring brief you can hand to any jeweler, avoid common mistakes, and turn inspiration into CAD-ready specs.
Quick decision path
Wearer first, then brief, then stone, setting architecture, metal, height, and size. Decide in that order and the process gets faster with fewer regrets.
Jump to: Ring brief · Center stone · Setting architecture · Ring size
Before you choose carats or settings, build a simple design brief you can share with any jeweler.
Start with the only must-have
The best rings do not start with a carat number. They start with the wearer.
Talk about surprise vs. collaboration
Modern couples often plan the ring together, even if the proposal moment stays a surprise. That is not less romantic - it is more respectful. It avoids immediate resizing, mismatched style, or conflicts with work and lifestyle needs.
The wearer-first rule
Design for the wearer's life, not the internet's taste. Ask:
- Do they wear jewelry daily or only for occasions?
- Are they hands-on at work (healthcare, engineering, kitchens, sports)?
- Do they want a low-profile ring or a taller, architectural look?
- Are they sentimental or modern and minimal?
Unique insight: Treat this like buying shoes. The prettiest pair is meaningless if it does not fit your day. Rings live on hands, and hands are always busy.
Build a ring brief (like a designer)
Most people shop rings. High-confidence buyers create a brief first.
Your 5 decision categories
Top design guides converge on the same pillars - style, stone, setting, metal, and timeline or budget. Your ring brief should answer:
- Style direction (3-5 descriptors such as clean, vintage, art deco, organic).
- Center stone (type, shape, measurements - not just carats).
- Setting architecture (solitaire, halo, three-stone; prong vs bezel; height).
- Metal (14k or 18k gold, platinum, color).
- Constraints (budget range, target date, height comfort range).
A simple 5-part brief makes it easier to compare options and get accurate quotes.
Need a deeper comparison before you pick a center stone? Read
our guide to diamonds vs moissanite vs lab diamonds
. And if you want to understand how settings affect comfort and wedding-band fit, see
ring anatomy explained
.
A one-page checklist you can reuse
Write this down (or build it in
Rinderr's design brief tool
) so you can send a clear brief to jewelers for quotes. Custom design involves multiple stages - consult, CAD, revisions, production - so clarity up front saves time and prevents expensive late changes.
Add one line most briefs skip: non-negotiables vs tradeables. Example: non-negotiable = oval stone and low snag setting; tradeable = hidden halo.
The 5-Part Engagement Ring Brief
A cleaner replacement for the current framework graphic
1. Style direction
Choose 3-5 descriptors: clean, vintage, art deco, organic, bold, minimal.
2. Center stone
Type, shape, millimeter size, cut priorities, and target face-up look - not just carats.
3. Setting architecture
Solitaire, bezel, halo, three-stone, prongs, height, wedding-band fit.
4. Metal
14k vs 18k, platinum vs gold, color, maintenance and allergy constraints.
5. Constraints
Budget range, timeline, non-negotiables, tradeables and lifestyle limits.
Best UX upgrade: add a final line for "non-negotiables" and "tradeables" to make jeweler quotes faster and more accurate.
Find your style - fast
You do not need perfect taste. You need patterns.
Style families (quick map)
Many guides categorize rings by style and setting types so readers can self-identify quickly. Try these buckets:
- Minimal or modern: solitaire, bezel, clean band.
- Classic: round or oval solitaire, subtle taper.
- Vintage or romantic: halos, milgrain, floral galleries.
- Art deco or geometric: step cuts, symmetry, sharp lines.
- Bold or fashion-forward: wide bands, east-west, cigar band looks.
- Nature-inspired: organic forms, leaf prongs, vine details.
How to use inspiration without copying
Save 10-30 rings and ask what repeats:
- Shape repeats (oval, emerald, round).
- Band repeats (thin, medium, wide).
- Details repeat (hidden halo, pave, bezel edge).
Do not chase one perfect photo. Chase the recurring patterns your taste keeps choosing.
The 20 percent rule (make it yours)
Communities and vendor guides often discourage exact replicas. The best outcome is a ring inspired by a vibe, not a carbon copy.
Simple ways to change 20 percent:
- Switch prong style (claw to button prongs).
- Change halo type (none to hidden).
- Modify band profile (knife-edge to rounded comfort).
- Add a signature gallery detail that feels like you.
Set a budget that protects your future
A ring should celebrate your relationship, not financially stress-test it.
Budget math (practical, not performative)
- Keep an emergency buffer intact.
- Decide if this is a now ring with future upgrades or a forever ring.
- Custom design includes labor and CAD, not just materials.
Where the money actually goes
- Stone drives the biggest price range, especially with diamonds.
- Metal fluctuates with market price and weight.
- Setting complexity adds labor (pave, halos, engravings).
- Aftercare and resizing limitations can add future cost.
Budget for year two, not just day one. Frequent repairs can erase a lower upfront price.
Choose the center stone with confidence
You cannot design the ring until the center stone is defined.
Want a fast comparison across stone types and shapes? Browse options in
Rinderr's ring explorer
to narrow your shortlist before you commit.
Diamond shapes and what they communicate
GIA notes that diamond shapes have distinct visual personalities and setting considerations. Quick shorthand:
- Round: brightest classic sparkle.
- Oval: elegant, elongated, flattering.
- Emerald: sleek, quiet luxury, shows clarity more.
- Cushion: soft, romantic, vintage-friendly.
- Pear or marquise: dramatic, directional, bold.
Durability basics (daily wear reality)
For everyday wear, durability matters. Choose stones and settings that protect corners and edges, especially for fancy shapes.
Measurements over carats (face-up size)
Weight alone can mislead. Millimeters are what you see. Compare length and width, not just carats.
Build your brief around face-up coverage, not carats: ring size, target footprint, and comfort constraints.
Pick the metal that matches real life
Metal is not just color. It is comfort, maintenance, and durability.
14k vs 18k gold (daily wear)
Many jewelers frame 14k as a durability sweet spot for frequent wear because it is more alloyed than 18k, while 18k reads richer in color.
Platinum vs white gold
Platinum tends to displace rather than lose material, creating patina, while gold can lose tiny bits over time. Both can be excellent; maintenance preference matters.
Allergy notes
Nickel sensitivity is common. Ask about nickel-free alloys and plating choices if the wearer reacts to jewelry.
Choose metal for repeated wear, not just showroom color.
Choose a setting architecture - not just a look
This is where most regrets happen, because settings are engineering.
Setting types that dominate search results
Authoritative guides repeatedly cover prong, bezel, halo, and side-stone styles because they define both aesthetics and security.
- Prong or solitaire: maximizes light and sparkle.
- Bezel: protective rim, modern and practical.
- Halo: bigger visual footprint and sparkle frame.
- Three-stone: symbolism and finger coverage.
Ring anatomy (talk like a pro)
- Shank: the band around the finger.
- Head: the part holding the center stone.
- Gallery: side profile support under the stone.
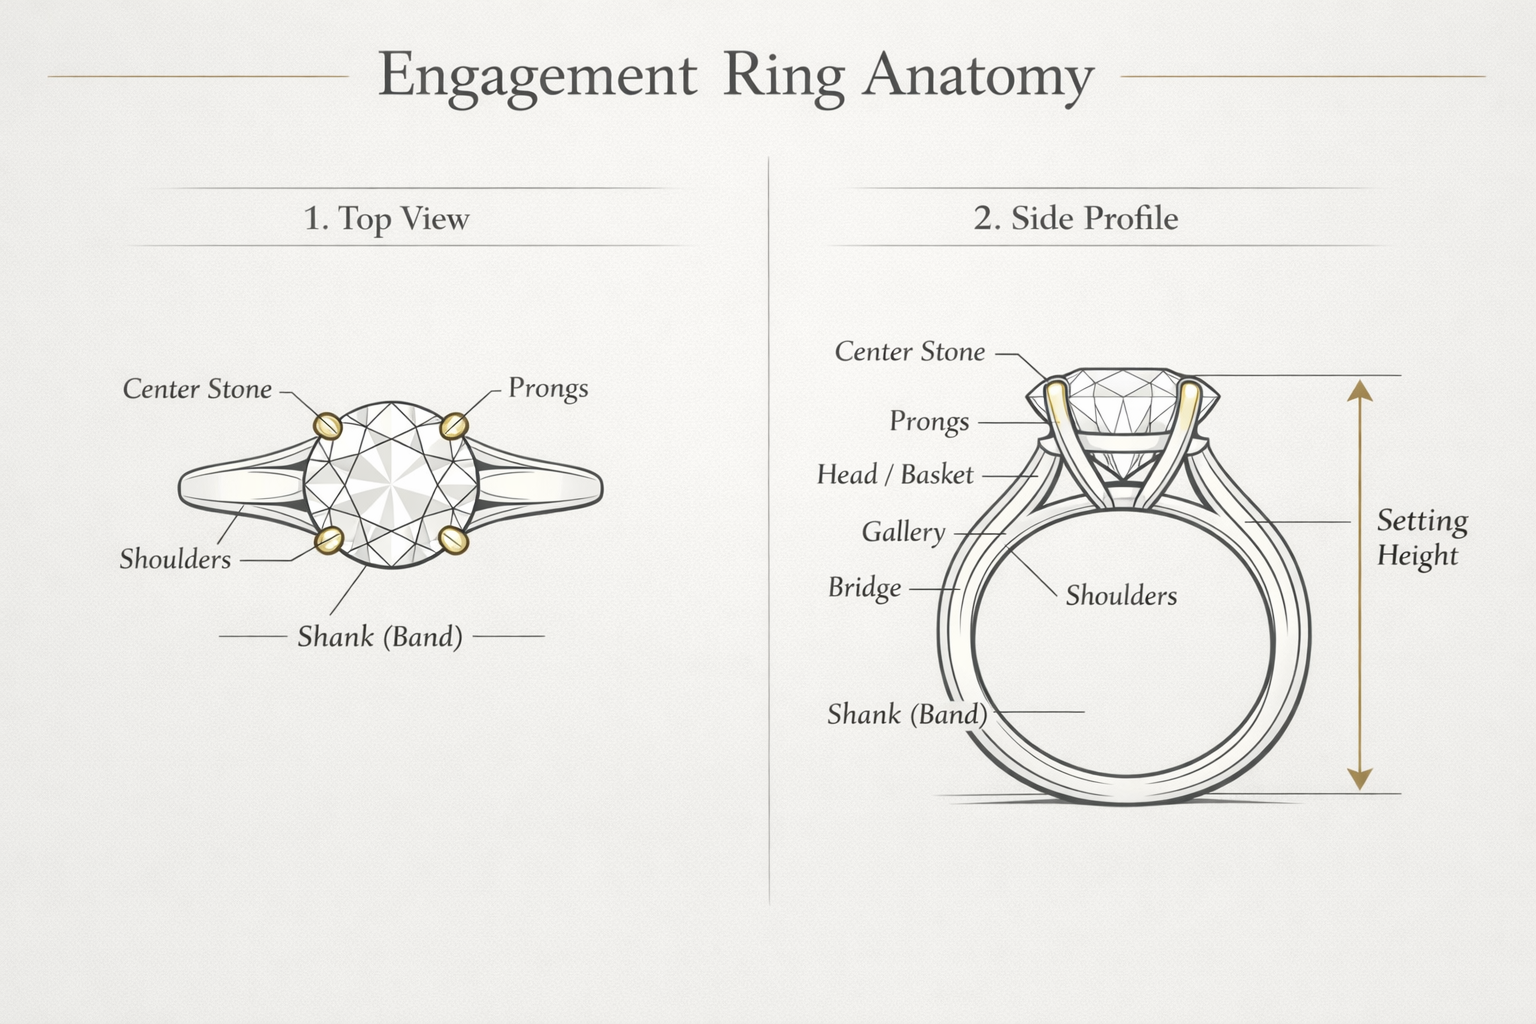
Side profile labels for shank, head, prongs, gallery, donut, and setting height.
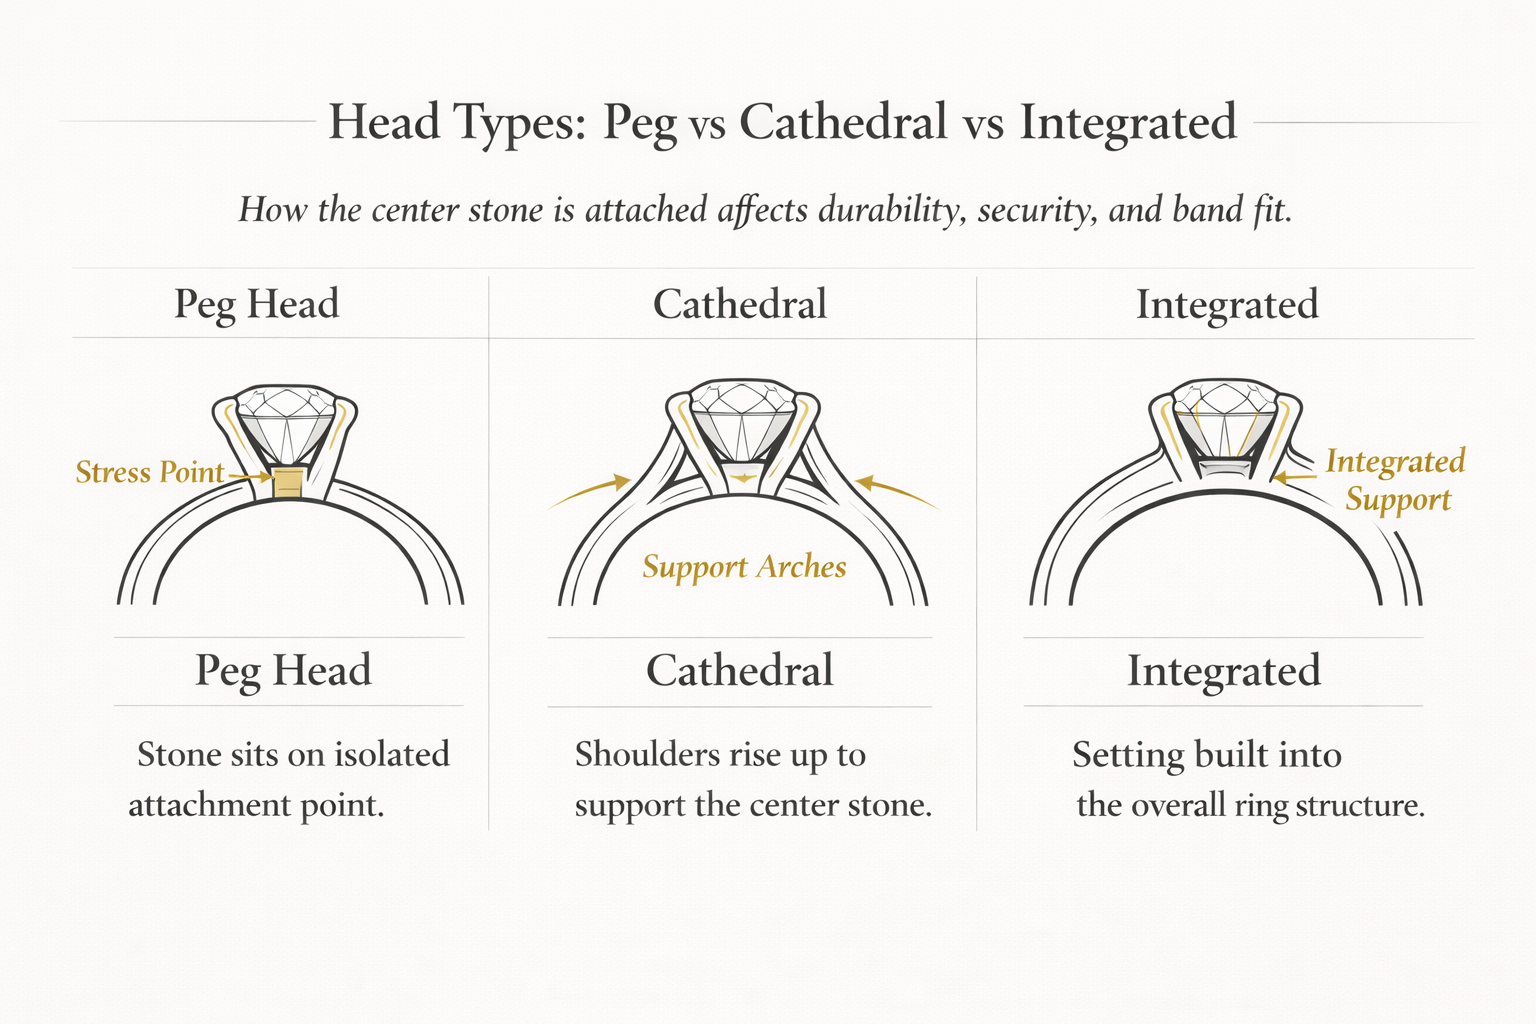
Structural integrity: peg head vs cathedral
Some popular designs are mechanically riskier than they look. Peg head designs can concentrate stress at the attachment point. Cathedral or integrated designs spread forces across more contact points.
Ask for a failure-mode explanation: if the ring catches on fabric, what bends first and what protects the center stone?
How the center stone is attached affects durability, security, and wedding-band fit.
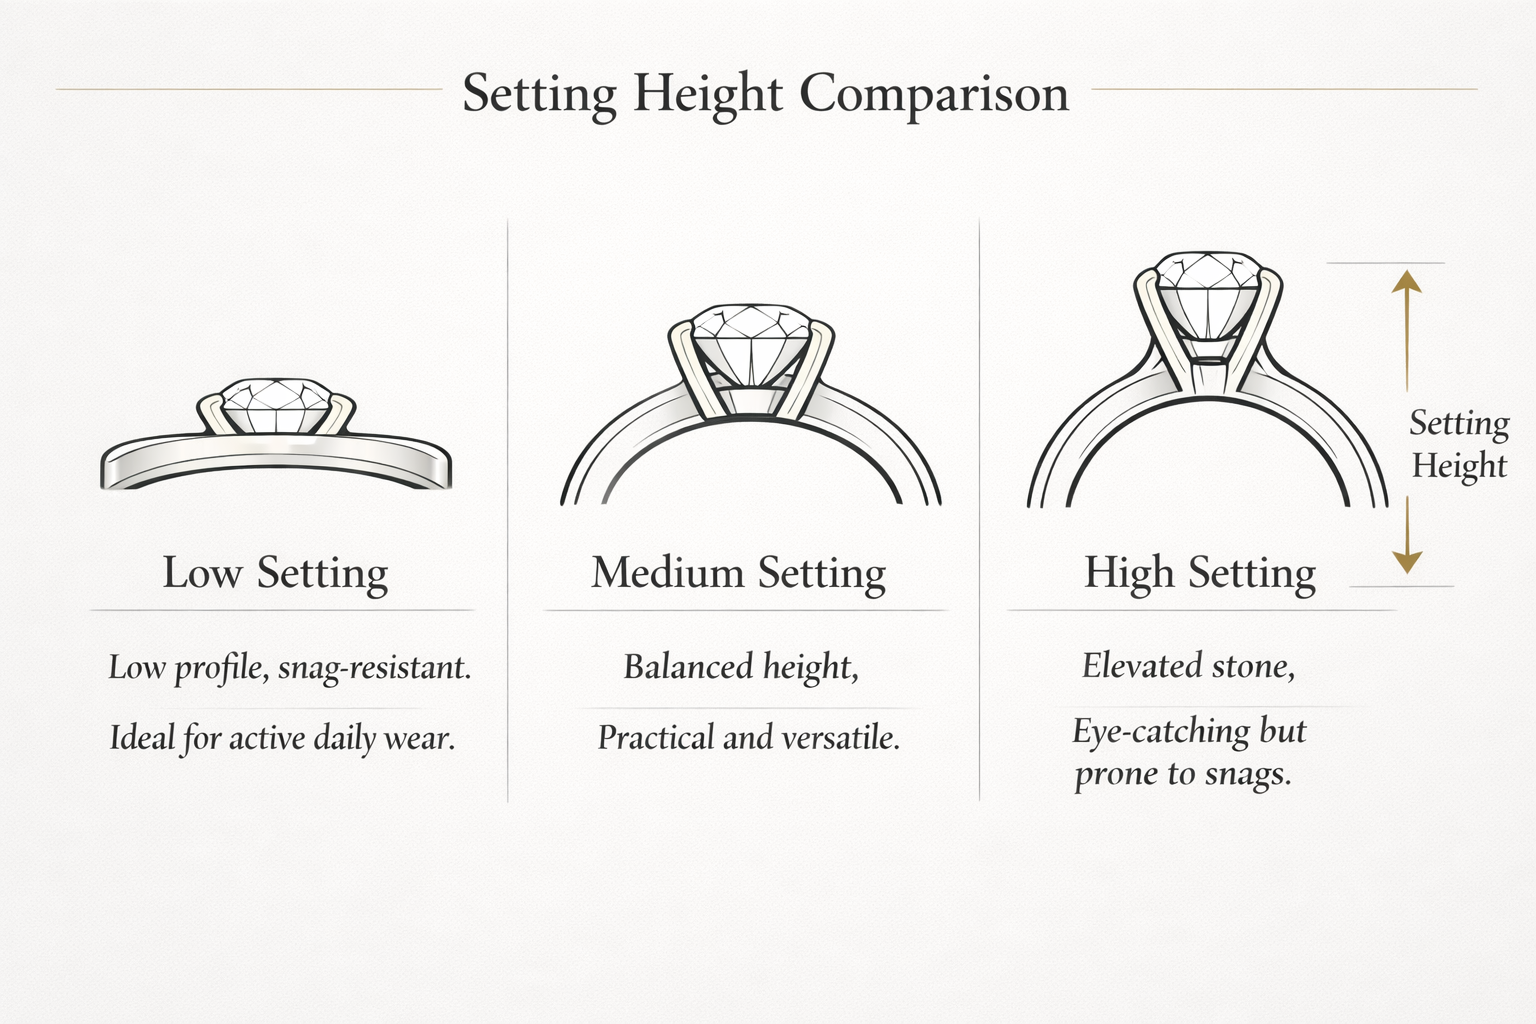
Decide the ring height (and avoid regret)
Setting height is the difference between I love it and why does this catch on everything.
Same stone and band, three heights. Compare snag risk, wedding band fit, and protection level.
Low, medium, high tradeoffs
- Low profile: more practical, less snagging.
- Medium: balanced presence.
- High: dramatic, more exposure to bumps.
A practical height framework (mm ranges)
Community discussions often cite around 6 mm as average, with comfort varying beyond 6.5 to 8 mm depending on setting style. Treat this as anecdotal and test in real life.
Lifestyle test (the daily moves audit)
Do these motions with your hand:
- Put on a coat, gloves, backpack straps.
- Grab a shopping cart, open doors.
- Wash hands, cook, lift weights.
Ask for two side-profile renders: one optimized for sparkle and one optimized for daily wear.
Ring size and comfort engineering
Ring size impacts band width, pavé decisions, and future resizing options.
Why string tricks fail (and what works)
GIA cautions that string and paper methods can be inaccurate. Get sized by a jeweler if possible, or use a proper ring sizer and reliable chart.
Band width affects fit
Wider bands fit tighter because more skin contact increases friction. Plan for sizing nuance if you choose a wider or cigar band.
Resizing limitations
Some styles are limited for resizing, especially full eternity or heavy pave.
When to size up or down
Finger size changes with temperature, hydration, and time of day. Measure under normal conditions.
Add sizing as a range in your brief (for example target size 6 with seasonal variation).
Need exact sizing steps before finalizing your ring?
Read the full Ring Size Guide
for measurement methods and fit checks.
Turn inspiration into specs (CAD-ready)
Custom processes become smooth when you specify measurements, not vibes.
Measurements you must request
- Center stone millimeter dimensions (not only carats).
- Band width and thickness at bottom and shoulders.
- Setting height (finger to table or top).
- Prong count and style.
- Gallery clearance for wedding band fit.
- Pre-polish vs post-polish dimensions.
CADs can reflect pre-polish dimensions; finishing can remove small amounts of metal.
Unique insight: ask for a tolerance note - acceptable variance for thickness or width after finishing.
Choose the right jeweler (and collaborate well)
Top guides emphasize choosing a jeweler whose style you trust and starting early because custom takes time.
What to ask in consults
- How many CAD revisions are typical?
- Can you show side profiles at different heights?
- What is your policy if a pave stone falls out?
- Do you recommend a comfort-fit interior?
- How will a wedding band sit with this setting?
Timeline expectations
Custom timelines vary. Some jewelers note that once a design is finalized, crafting can be around eight weeks. Start early, especially if you want multiple revisions.
Your timeline is not just production; it is decision time. Clear briefs reduce revision loops.
Approve, produce, protect
The finish line is not it arrives. It is it stays perfect over time.
What to check in final photos
- Symmetry (stone centered, prongs even).
- Height looks as expected.
- Pave alignment.
- Wedding band fit if applicable.
- Comfort edges inside the band.
Annual maintenance and insurance basics
Many jewelers recommend periodic checkups for prongs, pave, and replating. Consider insurance if the ring is significant relative to your finances.
Set a recurring annual reminder for prong and setting checkups.
How Rinderr helps you design faster
Rinderr exists to remove the most painful part of ring design: not knowing what you like until it is too late.
Swipe-based taste discovery to design brief
Instead of scrolling forever, you swipe and save patterns. Rinderr turns those patterns into a shareable style summary.
Compare proportions with simulators
Use size simulators and millimeter comparisons to align what looks good online with what looks right on a hand.
Share-ready brief for your jeweler
A clear brief makes your outcome predictable and saves time in consults.
Build your brief in minutes
Prefer a guided path? Rinderr helps you turn saved inspiration into a clear ring brief you can share with jewelers.
Start swiping on Rinderr
Quick Takeaways
- Design for the wearer's life first: work, hobbies, comfort, snag risk.
- Create a one-page ring brief (style, stone, setting, metal, constraints).
- Choose center stones by millimeters, not just carats.
- Pick a setting based on architecture and security, not only looks.
- Decide height intentionally. Millimeters matter more than you think.
- Get ring size accurately and avoid unreliable string methods.
- A ring is a long-term object: plan maintenance and aftercare early.
FAQs
How long does it take to design a custom engagement ring?
Plan for consultation, CAD revisions, and production. Many jewelers advise starting early. Some note production can be around eight weeks after design finalization, depending on complexity.
What's the best setting for everyday wear?
Prioritize protection and snag resistance. Bezels and lower-profile baskets are often more practical than very tall prongs while still looking elegant.
How do I choose between 14k and 18k gold?
If durability is a priority, many people prefer 14k for added alloy strength. If richer color matters most, 18k may be preferred. Your jeweler can recommend based on your band width and setting style.
How do I measure ring size accurately at home?
If possible, get sized by a jeweler. If you must do it at home, use a proper ring sizer or reliable chart. GIA cautions that string and paper methods can be inaccurate.
What details should I confirm on the CAD?
Confirm band width and thickness, setting height, prong design, stone millimeter dimensions, and whether CAD measurements are pre-polish or post-polish.
Conclusion
Designing an engagement ring is a rare chance to build something that is both beautiful and deeply personal, but it is also a functional object that has to survive real life. The secret is choosing in the right order. Start with the wearer's lifestyle, build a simple ring brief, and move step-by-step through stone, setting architecture, metal, height, and ring size. When you do that, the process becomes calm and clear and the final ring feels inevitable.
Remember: millimeters matter more than most people realize. A tiny change in band thickness can decide whether a ring warps. A small change in height can decide whether it snags. A small sizing error can decide whether it is worn daily or left in a drawer. Use expert resources for settings and sizing, and lean on a jeweler who can explain the why behind each choice.
If you want a faster path from inspiration to a confident design brief,
Rinderr
helps you discover your style patterns, compare proportions, and share a clear direction with your jeweler so you spend less time scrolling and more time creating.
Next step: start saving 15 to 30 rings you like, and we will turn them into your first draft ring brief.
Related reading
Read next in this series
Reader feedback and share prompt
If this guide helped, share it with someone who is ring-shopping (or hint-dropping). What is your biggest engagement ring worry right now - price, size, height, or choosing the right style?
Next step: turn your brief into real options
If you have a shortlist for style, stone shape, and setting height, you are ready to start comparing designs instead of doom-scrolling.
Build a one-page ring design brief on Rinderr
(then share it with jewelers for accurate quotes).
Browse rings by stone type and style
to sanity-check proportions and details.