Ring Anatomy Explained: Heads, Shanks, and Settings Demystified
If you’ve ever tried to describe a ring you love and ended up saying “it’s like… a round-ish thing with the sparkly bit and the metal swirly part,” you’re not alone. The fastest way to design the right ring (and avoid expensive misunderstandings) is learning engagement ring anatomy—the names of the parts, what they do, and which parts actually change comfort, durability, height, and wedding-band fit.
This guide is your plain-English map of the ring: shank vs. shoulder, head vs. basket, gallery vs. bridge, prongs, halos, hidden halos, and all the small details that make two “similar” rings wear totally differently. We’ll also connect the vocabulary to real decisions—like why some heads are riskier, why band thickness matters, how to communicate CAD changes, and how to choose proportions that fit your lifestyle.
By the end, you’ll be able to speak “jeweler” confidently, swipe smarter on Rinderr, and turn inspiration into precise specs—without getting overwhelmed.
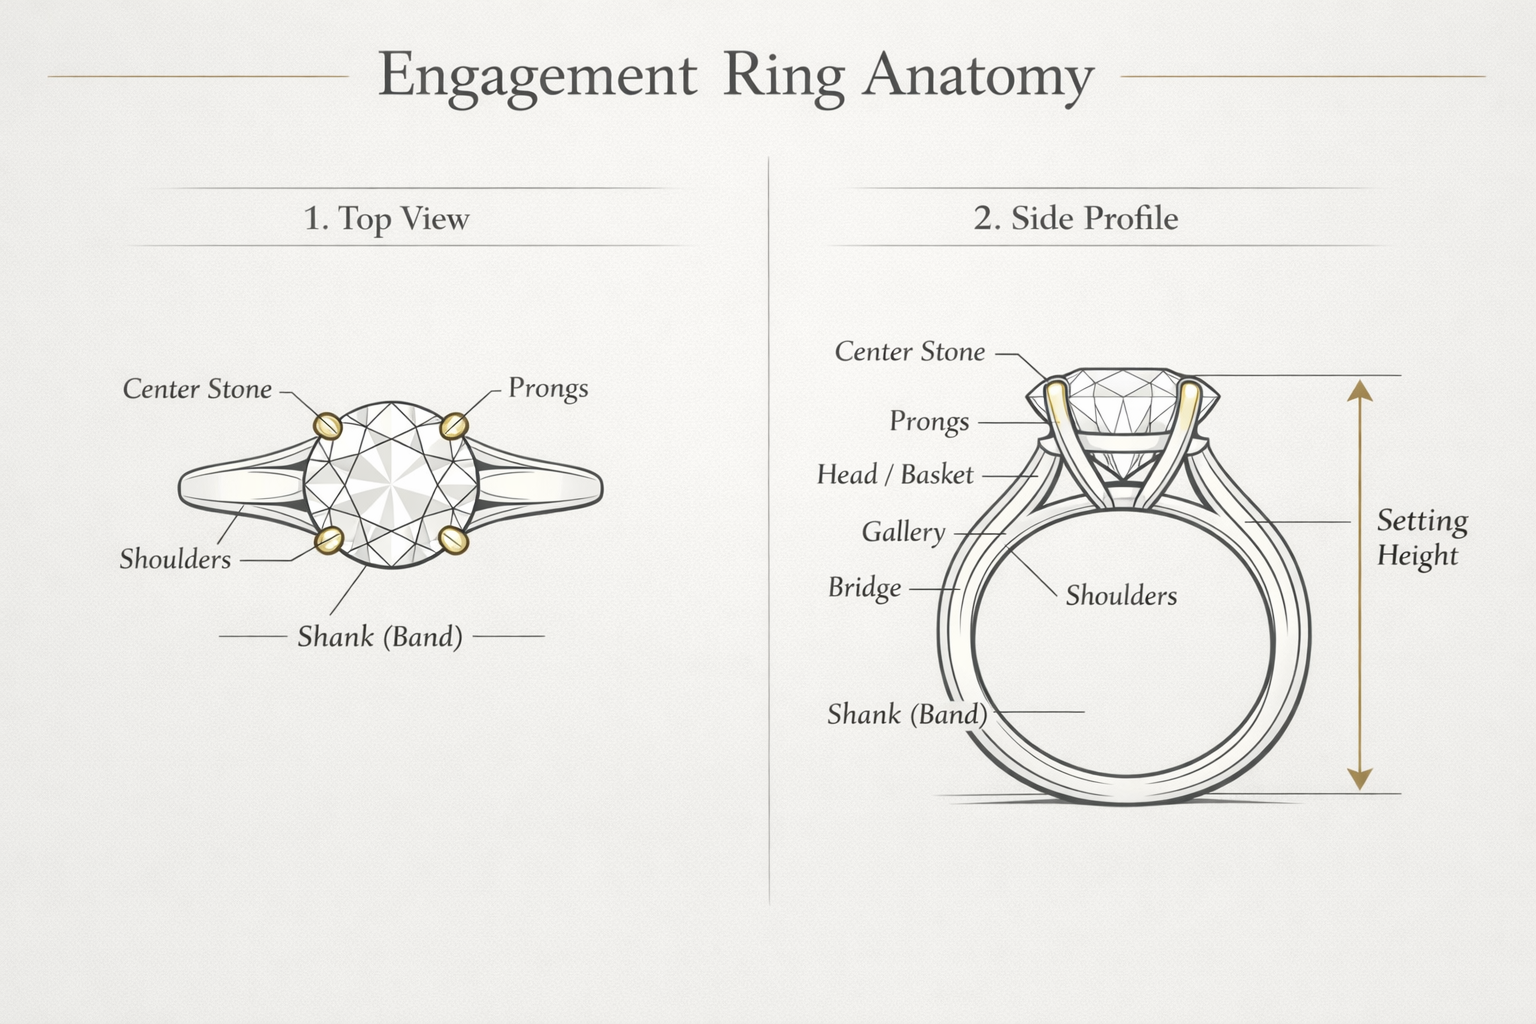
Save this diagram and use the labels when you give feedback on CAD, height, and wedding-band clearance.
Why Engagement Ring Anatomy Matters (More Than Style)
Learning engagement ring anatomy sounds like homework—until you realize it’s the shortest path to getting a ring you actually love wearing. Most couples don’t struggle because they have “bad taste.” They struggle because they’re trying to communicate a 3D object with emotional meaning using vague words like dainty, secure, too tall, or vintage-y. Anatomy gives you a shared language with jewelers (and with your future self).
Anatomy is a design language
Top educational guides break rings into consistent parts—shank/band, shoulders, head/setting, prongs, gallery, bridge—because those parts control what you see and feel. When you can name the part, you can change the part. And when you can change the part intentionally, you stop “hoping” a ring will work and start designing it.
Anatomy prevents the three most common regrets
“It’s gorgeous but it catches on everything.”
That’s usually height + prongs + head structure, not “bad luck.” Setting guides explain how different head types and settings affect how high/low a ring sits.
“It looked delicate online, but it feels bulky.”
That’s usually band thickness, shoulder width, and head dimensions—things CAD can show if you know what to check.
“My wedding band doesn’t sit right.”
That’s clearance, bridge design, and head placement—again: anatomy. Many anatomy pages highlight bridges/galleries because they directly impact pairing.
Unique insight: The internet pushes style names (“hidden halo,” “cathedral”), but your day-to-day happiness is decided by engineering words (“height,” “bridge clearance,” “shank thickness,” “support points”).
The Ring’s Foundation: Shank (Band)
If engagement ring anatomy had a “main character,” it’s the shank—the band that wraps around the finger. Many guides explicitly call out the shank as the foundation of comfort and durability.
Metal matters here too. If you are still choosing between gold karats and platinum alloys, see
The Metal Matters: Gold, Platinum, and Beyond
for a durability and maintenance breakdown.
Width vs thickness (and why both matter)
People often say “I want a 2mm band,” but that’s only half the story. You’re choosing:
- Width (how wide it looks from above)
- Thickness (how tall the band is from the side)
In practical ring design guidance, a sturdier range is often around ~1.8–2.2mm+ depending on style and whether pavé is involved (especially for daily wear).
Band profiles: half-round, flat, knife-edge
- Half-round: classic, soft edges
- Flat: modern, can feel wider
- Knife-edge: a crisp ridge; looks slim but still can be strong
Comfort fit vs standard fit
Comfort fit is a slightly rounded interior that can feel smoother, especially on wider bands. Some anatomy/manufacturing guides specifically mention comfort-fit vs standard/flat fit.
Unique insight: Comfort fit is the “silent luxury” feature: you don’t notice it in photos, but you notice it every day.
Shoulders & Taper: The Transition Zone
In engagement ring anatomy, shoulders are the upper sides of the shank where it approaches the head.
What shoulders do for silhouette
- More delicate (tapered shoulders)
- More substantial (flat, broad shoulders)
- More vintage (engraving/milgrain along the shoulder edge)
A taper is one of the most powerful “design illusions” in jewelry. You can keep the bottom band comfortable and sturdy, then taper the shoulder so it looks refined near the stone.
Tapering: visual tricks vs structural reality
Tapering looks elegant, but if the shoulder gets too thin where it meets the head, you can create a weak junction (especially in designs where the head is attached at a single point).
When to thicken the shoulders
When you’re choosing a taller head, heavy center stone, or any design with pavé near the top, thickening shoulders can improve stability.
Unique insight: Think of shoulders like the suspension on a car: you don’t buy it for aesthetics, but it decides how well the whole thing survives bumps.
The Head (Center Setting): Where the Engineering Lives
The head is the part that holds the center stone. Some sources call it the head, crown, or center setting; many clarify that it includes prongs and basket-like structures.
Head vs crown vs center setting (terms you’ll see)
- Head / center setting: the metal structure connecting stone to shank
- Crown: sometimes used similarly (varies by retailer)
- Basket: a head variant with additional reinforcement around prongs
Basket vs prong head vs integrated head
- Traditional prong head: clean, open, can sit higher
- Basket: reinforced, often lower, more protective
- Integrated head: built into the shank, often stronger than a soldered head
Peg head vs cathedral: the “stress point” concept
A peg head is soldered onto the shank separately, often with a higher profile. Cathedral settings use arches rising from the shank toward the stone, distributing support through the shoulders.
Same center stone, different head architecture: support distribution changes durability, snag risk, and whether a straight wedding band sits flush.
Unique insight: Don’t ask “Is cathedral better than peg head?” Ask: “Where is the stress concentrated if the ring gets caught?”
Prongs, Claws, Bezels: How Stones Are Held
Stone security comes down to how the stone is held—usually prongs or a bezel. This determines maintenance and daily durability.
If you are deciding between diamonds, moissanite, and lab diamonds (and want a simple durability + sparkle comparison), read
Choosing the Right Stone
before you lock in a setting style.
Prong styles (claw, round, tab) and stone shapes
- Claw prongs: sharper, delicate look
- Round prongs: classic, slightly more protected feel
- Tab prongs: often used on corners (e.g., emerald cuts)
Bezel anatomy and protection
A bezel is a metal rim encircling the stone edge. It generally offers more protection, especially for active wearers or stones with vulnerable edges.
Gallery rails and hidden supports
Some settings include gallery rails (support bands around prongs) that add strength and can change the ring’s side profile.
Unique insight: If you want a prong look but worry about durability, ask for a basket with subtle rails.
Gallery & Bridge: The Under-View That Changes Everything
If the head is the engineering, the gallery and bridge are the “invisible architecture.” They influence strength and wedding band fit.
What the gallery does structurally
The gallery is the space/structure beneath the center stone. It can stabilize prongs, determine how low the stone can sit, and create signature under-gallery styling.
What the bridge does for strength + aesthetics
The bridge is the part of the shank underneath the basket. It strengthens the head-to-shank relationship and affects wedding band clearance.
Hidden halo, hidden gemstone, and under-gallery details
- Add sparkle/detail without changing the top view
- Feel personal (a “secret” design element)
- Photograph beautifully from the side
Unique insight: Under-gallery features are the best place to be unique without risking style regret.
Halo, Hidden Halo, and Accents: Sparkle Architecture
Not all sparkle is created equal. Sparkle can come from center stone optics, pavé placement, halo structures, and reflective metal surfaces.
Classic halo vs hidden halo
- Halo: visible ring of small stones around the center stone
- Hidden halo: placed under the center stone’s edge
Pavé band vs pavé bridge
- Pavé band: sparkle from above, higher maintenance
- Pavé bridge: hidden sparkle, often lower risk of abrasion
Melee choices (diamond vs moissanite) and repair reality
Diamonds are widely serviced; moissanite melee may be less familiar for some local jewelers. The tradeoff: moissanite melee can be bright and budget-friendly, diamonds can be easier to source and replace.
Unique insight: If you want drama but low maintenance, move sparkle into protected zones (hidden halo, bridge accents) rather than micro-pavé on every exposed surface.
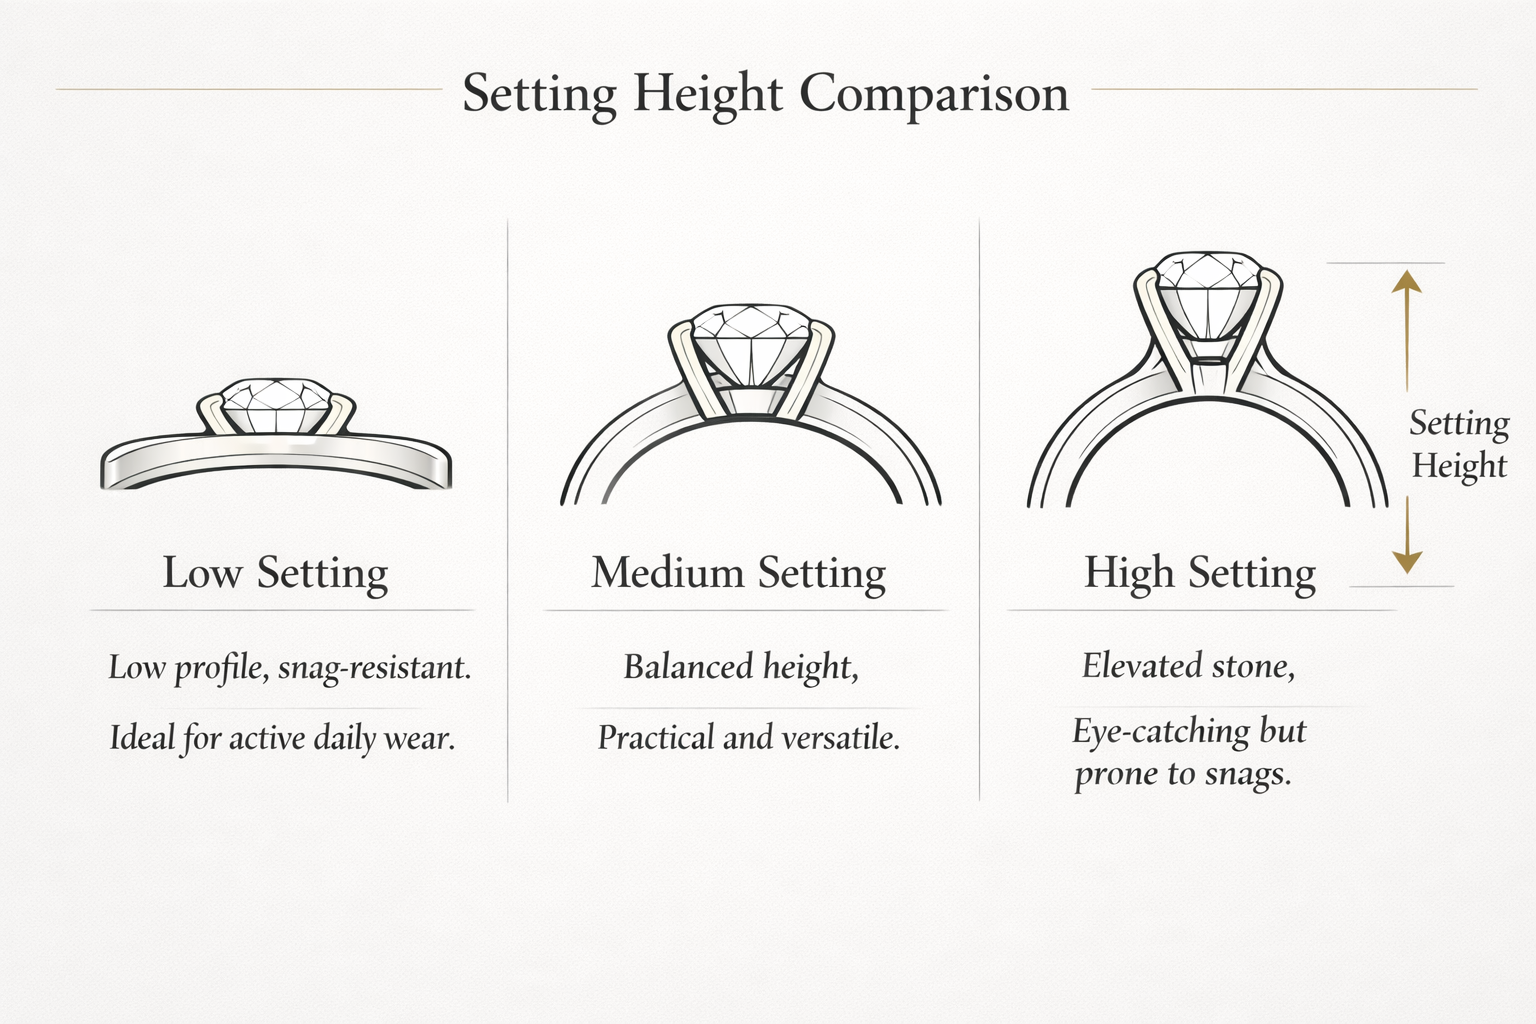
Ring Height, Clearance, and “Will It Snag?”
Setting height isn’t a vibe—it’s a lifestyle choice. Height is controlled by head style (basket vs tall prongs), gallery design, and shoulder rise.
Low, medium, high settings (mm thinking)
- Low profile: easier daily wear
- Medium: balanced
- High: dramatic, more snag exposure
Clearance for wedding bands
Height and gallery clearance determine whether a straight wedding band sits flush. If you want flush fit, request it early.
Lifestyle test for height
- Coat pockets, hair, sweaters
- Baby gear, stroller handles
- Gym gloves, cooking, desk work
Unique insight: You can design a big-looking ring with lower height using a wider footprint (halo, three-stone, bezel with thin rim).
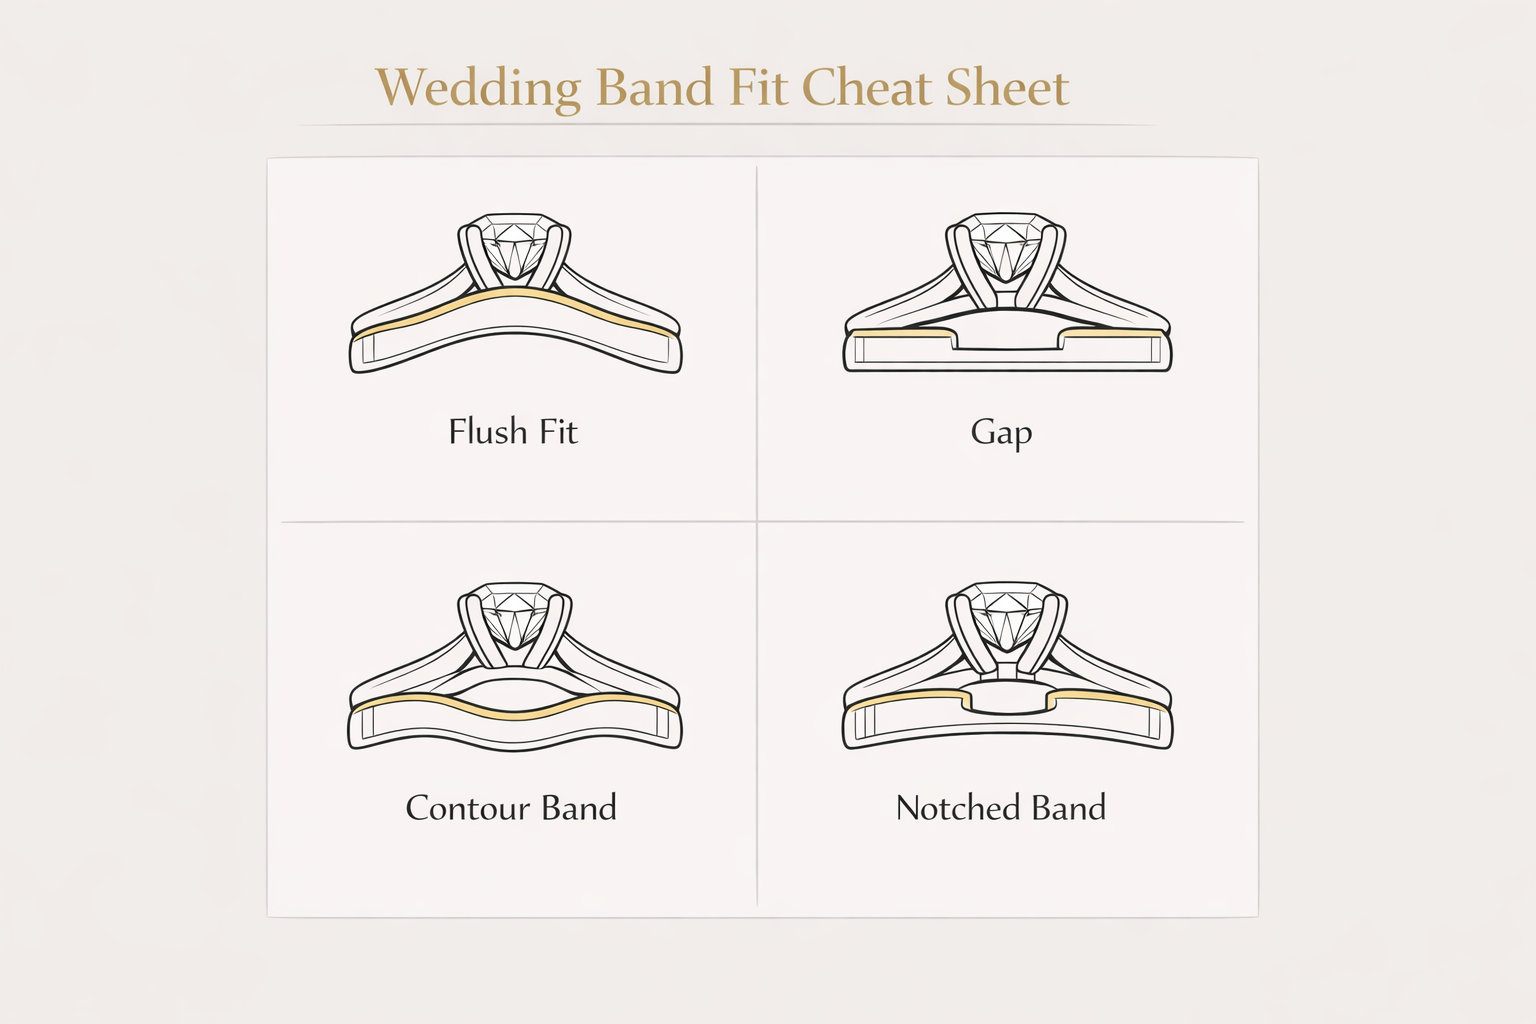
Wedding Band Fit: Flush, Gap, Contour, Notched
This is where engagement ring anatomy becomes marriage-day reality: can you wear your rings together comfortably?
If you care about flush fit, mention it early—your head, bridge, and gallery design decide what band styles will work.
Why heads and bridges create gaps
If the head or basket protrudes low, a straight band may bump it. That’s why bridges and galleries directly impact pairing.
Solutions: contour, chevron, notched, open bands
- Contour band: shaped to the engagement ring
- Chevron band: V-shape that frames the head
- Notched band: cut-out area to nest against the head
- Open band: leaves space for the head to sit inside
When “the gap” is a feature
Some wearers love the visual separation. The important part is choosing it on purpose.
Unique insight: “Flush” is a design requirement, not a styling afterthought.
Hallmarks, Sizing Area, and the Stuff People Forget
Sizing zone and resize risk areas
The bottom of the shank (often called the sizing area) is where resizing happens. If that zone is covered in stones (eternity or heavy pavé), resizing becomes limited or risky.
Hallmarks and what they can tell you
Hallmarks can indicate metal content (e.g., 14K, 18K, PT950), maker marks, and sometimes origin. It’s not a full “quality certificate,” but it’s useful metadata.
Unique insight: Ask your jeweler where they plan to place hallmarks and whether resizing later could disturb engraving or pavé.
How to Use Engagement Ring Anatomy in CAD Feedback
The 10-point CAD checklist
- Shank width (bottom + top)
- Shank thickness (bottom + top)
- Shoulder width/taper
- Head type (basket, prong, integrated)
- Setting height (mm)
- Prong count + style
- Gallery rails / reinforcement
- Bridge design + clearance
- Wedding band flush fit (yes/no)
- Comfort fit interior (yes/no)
Pre-polish vs post-polish
Confirm whether CAD dimensions are pre-polish. Finishing can slightly soften edges and alter the “feel” of sharp profiles.
Giving measurable feedback
Instead of: “Make it more delicate.” Say: “Reduce prong thickness by 0.2mm; keep band thickness at 1.8–2.0mm for durability.”
Unique insight: You don’t need to be a jeweler—you need to be a good editor.
How Rinderr Helps You Learn Your Design Language
Most people don’t have a vocabulary problem—they have a preference discovery problem. Rinderr solves that by turning gut reactions into patterns.
Swipe patterns → anatomy preferences
After 20–50 swipes, you’ll notice you prefer certain shank widths, consistently save hidden halos, or dislike tall heads.
Simulator: proportions that fit your lifestyle
Use proportion tools (and stone size simulators) to check height, footprint, and band width before you commit.
Unique insight: The future of ring shopping is not more photos—it’s better translation from inspiration → anatomy → specs.
Diagrams (downloadable visuals)
These visuals are designed to match the sections above—so you can learn faster and communicate more clearly with jewelers.
Quick Takeaways
- Engagement ring anatomy is your design language—learn it and custom becomes easier.
- The shank controls comfort and durability; width and thickness are different decisions.
- The head determines height, security, and daily behavior.
- The gallery and bridge change stability and wedding band fit—don’t ignore the underside.
- Hidden details add personality without making the top view trendy.
- Use anatomy terms in CAD feedback to get exactly what you mean—faster.
FAQs
What are the main parts in engagement ring anatomy?
Most guides list: shank (band), shoulders, head/crown (center setting), prongs, gallery, bridge, plus accent elements like halos or pavé.
What’s the difference between a head and a basket?
A head is the structure holding the center stone; a basket is a head style that adds reinforcing elements around prongs—often improving durability and sometimes lowering the profile.
What is a ring bridge and why does it matter?
The bridge is the area under/near the basket connecting structural elements; it affects strength and can affect wedding band clearance.
Why does my wedding band not sit flush?
Usually because the head/basket or bridge sits in the wedding band’s path. Solutions include contour, chevron, notched, or open bands—designed to nest with your engagement ring anatomy.
How do I explain what I want to a jeweler?
Use anatomy words + measurements: shank width/thickness, setting height, prong style, head type, and whether you want flush wedding band fit.
Conclusion
Most engagement ring stress comes from one simple problem: you can’t describe what you want clearly—until you learn engagement ring anatomy. Once you know what a shank is, what the head controls, how prongs differ from bezels, and why the gallery and bridge matter, you stop shopping blindly and start designing intentionally.
Use anatomy to protect what matters: comfort, durability, and lifestyle fit. If you’re active, prioritize lower profiles and protective structures. If you love timeless simplicity, invest in proportions rather than trendy details. And if you want uniqueness without regret, put your signature in the under-gallery.
If this helped you finally understand rings in “real words,” share it with someone who’s ring shopping. Which part of engagement ring anatomy confused you most before today—head vs basket, gallery vs bridge, or shank thickness vs width?
Build your ring brief on Rinderr
Open Rinderr, compare ring structures side by side, and note the anatomy patterns you keep choosing (shank width, head height, prong style, and halo details). That gives you a precise brief you can hand to any jeweler.
Start your ring design brief on Rinderr
Related reading
References
- Brilliant Earth — Anatomy of a Ring / Styles & Settings
- Borsheims — Parts of a Ring (includes peg head)
- Ken & Dana — Ring Setting Guide (basket, cathedral, etc.)
- TMC Fine Jewellers — Anatomy of a Ring (bridge, hidden halo, pavé)
- Frank Darling — Ring Anatomy 101: How to Talk Like a Pro
- Victor Canera — Anatomy of a Ring (education)